Lesson 1: We prepare an exhibition
Living Democracy » Textbooks » Growing up in democracy » UNIT 9: Media – Media in use: I would if I could » Lesson 1: We prepare an exhibitionOld and new media devices – what do we find?
| Learning objectives | The students realise that it is important to understand the technical details of media devices and to invest the necessary time for this. They prepare an exhibition of their own and the school’s devices. |
| Student tasks | Using a device they are not familiar with, the students try to describe the device and the way it functions. They collect and describe different media devices and prepare a class exhibition. |
| Resources | A media device (such as a camera, etc.), handout. |
| Methods | Talks, group work, homework. |
Lesson description
In order to make students aware of the topic, the teacher should bring a media device to school (such as a camera, a slide projector, computer, video camera, mobile phone, an old f lm camera, a tape recorder, an overhead projector, etc.). The instruction manual for the device will also be needed but the teacher should not make this available at first, however.
At the beginning of the lesson, the device lies on a table in the middle of the classroom. The students are given the task to explain how the camera or other device works even though they aren’t familiar with it. They do that by making a drawing of the camera (for example) on which they indicate all the visible parts and buttons and label them (as shown in the picture below). It is also important that the students should draw the parts of the device they aren’t familiar with. They should write down what they think these parts are for.
Visualisation of the student’s drawings for the teacher:
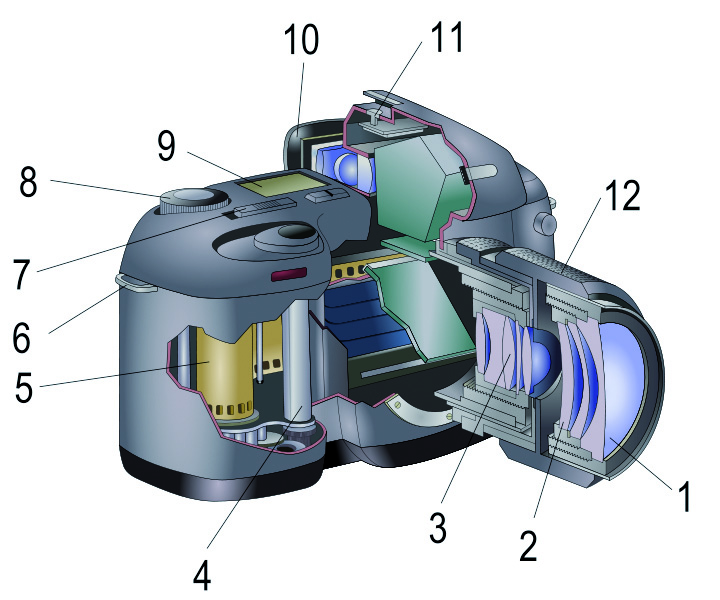 |
1: lens 2: objective 3: unknown 4: box 5: … 6: … |
The more complicated the device, the more difficult it will be to fulfil this task. It is important that the students should not be afraid of doing this. There is no right or wrong. The students have to become aware that such a device has many different possibilities and that it makes sense to get to know them.
Variation:
it is possible to copy the drawing including the legend onto a transparency for joint presentation.
The teacher then gives the instruction manual for the device to a group of students (if wished, he or she could have already done this the day before, without informing the rest of the class). Depending on the specific device, it will be impossible to describe and get to know all its functions. That doesn’t matter at this point as this is only an introduction.
Next, the teacher explains the goals and procedure of the entire unit:
- Organising an exhibition of media devices brought from home and from school (lesson 2).
- Getting to know one of the devices and its functions and possibilities and presenting it to other classmates (lesson 3 – plus additional lessons depending on the number of devices).
- When the devices have been understood, the class decides on a media product (film, audio story, photo exhibition, photo story, etc.) and develops a preliminary timeframe (lesson 4).
At the end of the lesson, the teacher should collect all the students’ ideas and give clear instructions on how to display all the devices in the classroom. He or she should hand the templates for the description of the devices to the students (handout).
Note: devices belonging to the school should be part of the exhibition too. Students who have not brought anything to school or students who have additional time should prepare the descriptions of the school devices and bring them to the exhibition.