Unit 4 (Primary school, Class 4) – Our rights – our treasure
Living Democracy » Textbooks » Exploring Children’s Rights » Part 1: Lesson plans » Unit 4 (Primary school, Class 4) – Our rights – our treasureA Lesson Plan
|
|
Key questions/lesson topics |
Main activity |
Resources |
|
Lesson 1 |
Why do we need special children’s rights? |
The pupils are introduced to the “treasure box” project, and they discuss how to plan and carry it out. |
Objects that may be used to represent certain rights of children (as examples and as inspiration); children’s rights cards, text on children’s rights (see appendix). |
|
Lesson 2 (plus out of school activities during the next weeks) |
My personal treasure box – something very special! |
The pupils decorate their treasure boxes and prepare them for their children’s rights treasures. |
Every child brings a metal, wooden or cardboard box, colourful buttons, rags of cloth, glue and scissors etc. to school. |
|
Lesson 3 (after an interval of several weeks) |
My treasure box, your treasure box: a mutual exchange! |
The pupils display their treasure boxes by arranging an exhibition on their desks. |
Pupils’ treasure boxes (with the contents). |
|
Lesson 4 (shortly before 20 November) |
How could we arrange an exhibition? |
The children exhibit their treasures and treasure boxes for all the other children in school to see. |
The pupils find a room or place for their exhibition (preferably – but not necessarily – in the school building). |
B Background and educational objectives
The pupils acquire a deeper knowledge and understanding of children’s rights. Over a longer period of time, they study the contents and intention of these rights by trying to match each right with an object that may illustrate or symbolise this right. Every child will find his or her own solutions. To do so, the children must have understood and interpreted the articles in question.
In terms of learning theory, the task allows the learners to actively organise their own learning processes, which considerably increases their chances of experiencing a sustainable increase of knowledge. In addition, by constructing his or her own individual treasure chest, each child identifies more strongly with their chosen children’s right, both on an intellectual and an emotional level.
This is a class project which continues over a longer period of time (between five and seven weeks) and which may inspire and stimulate the pupils to share and discuss their ideas during this time. On Universal Children’s Day (20 November), an exhibition of the pupils’ treasure boxes can be held in the school building. This provides additional stimulation and will motivate the junior pupils to do something similar one or two years later.
The most ideal time for starting the project would be between the end of September and the middle of October.
C Key questions for reflection on Unit 4
|
Experiencing children’s rights |
Getting to know children’s rights |
Implementing children’s right |
|
Teacher |
||
|
In what way have the principles of children’s rights been observed in the classroom and school community? |
What do the children now know about children’s rights? |
Learning how to take action outside school: What have pupils learned for their future lives? |
|
Every pupil enjoys the right to develop a personal form of artistic expression. In this way, pupils increase their self-confidence and learn more about themselves and each other. |
All children’s rights are introduced and discussed. |
Pupils learn to make decisions and to argue for the solutions that they have found. |
|
Pupils |
||
|
How did I experience children’s rights in class? |
What have I learned about children’s rights? |
What kind of action am I able to take now? |
|
It is wonderful if school can become a place where we can see so many works of art. I enjoy being at school. |
I have studied children’s rights for a long time. I had to make a decision about every article, and I could only do this if I had understood the article. I have realised that it is not always easy to understand the children’s rights convention. |
Not all articles in the children’s rights convention are equally important for me. I have thought about the question of which articles I could advocate. I have thought about the question of which rights are particularly important for other children in other families, regions or other countries, and what I could do to support them. |
D Procedure
Lesson 1 (end of September / beginning of October; duration: approx. 1 ½ hours)
Introduction: The teacher activates prior knowledge on children’s rights and recaps the most important points (see Unit 3, lesson 2). He or she gives the children copies of the children’s rights cards (see appendix) and explains them so that the children have a good grasp of these rights (which right is illustrated by which picture?) and are equipped to do the work required of them. This lesson requires time and good preparation on the part of the teacher, which means a thorough reading of the Convention on the Rights of the Child (see appendix). While introducing the children’s rights cards, the focus should not simply be a matter of reading out the various rights and matching a picture to each one, but much more a matter of using the pictures to tell a story or report on the particular right in question.
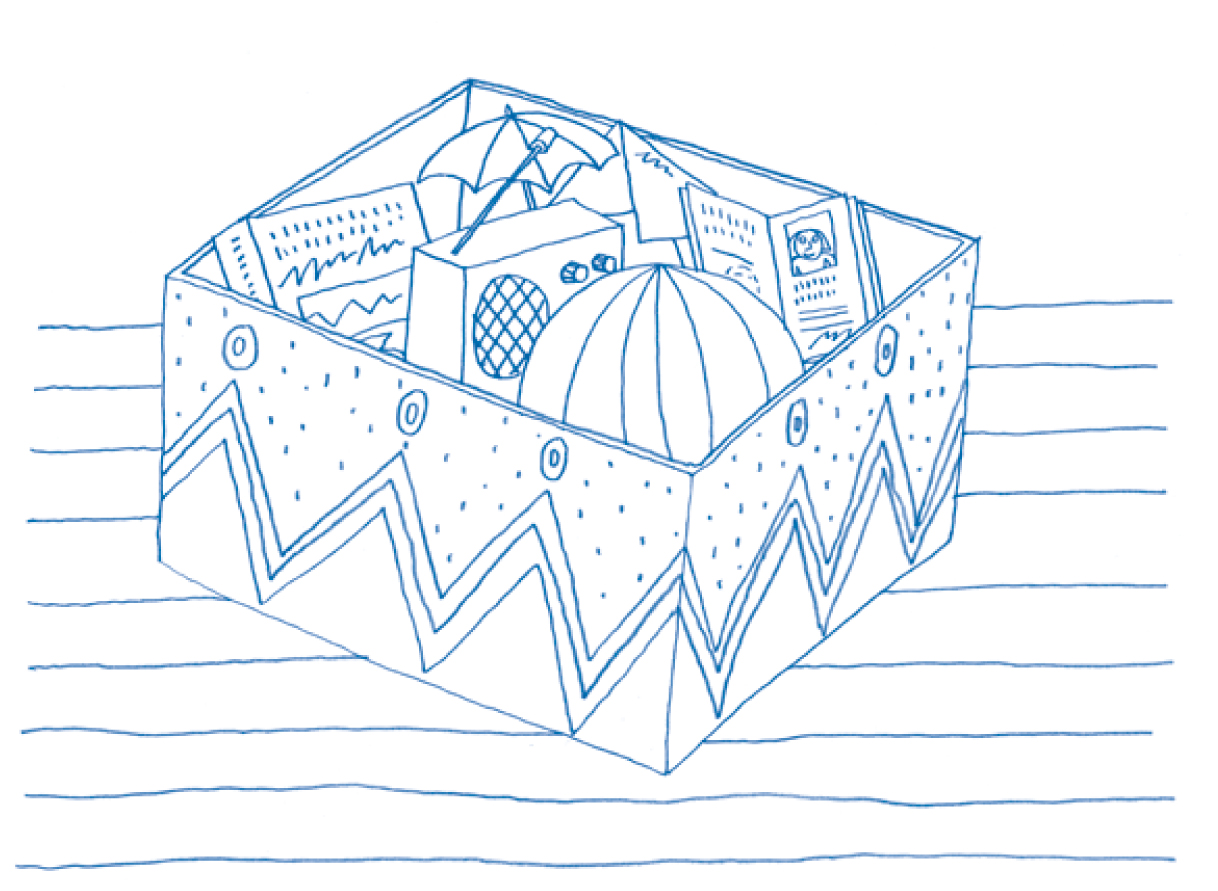
Next, the teacher places a box on the table that is decorated to look like a treasure chest next to the children’s rights cards. Alongside, he or she places an arrangement of objects that symbolise some of the children’s rights. For example, for Article 7 (right to a name from birth), a small candle could be placed as a reminder of a christening ceremony or birthday. For Article 28 (right to education), a pencil could be placed. The teacher explains the principle of symbolisation and discusses further examples with the pupils.
The teacher then explains the plan further:
Universal Children’s Day is on 20 November. Until then, each child should design and create a treasure chest. The chest should be filled with children’s rights cards and objects that relate to these rights. Each child is free to choose the objects that symbolise their chosen rights.
Concrete tasks: Each child has until next week to find and decorate a box so that it looks like a treasure chest. First, the children need to find a box that they can use to make a treasure chest with. This box could be made of cardboard, wood or metal and children should help each other to find a suitable box. Designing and decorating the box can partly be done in school during Art or Design and Technology classes, so that the homework task for the children can merely be to find a suitable box and decorating material to take to school and to bring enough material for themselves and some extra to share or exchange with their classmates.
All pupils receive the children’s rights cards and cut them out. They should be placed in the treasure chest as soon as it is ready. The instruction: Start looking for treasure, i.e. find your first treasures / objects that symbolise particular children’s rights!
A possible (meaningful) focus: Go over the children’s rights cards again and write keywords on the back of each card to summarise each right.
Lesson 2 (one week later)
The children show each other their material and the objects that they have brought with them to symbolise the rights written on their cards (see task above).
Discussion/Brainstorming
- on treasure chest design;
- on suitable “symbols” for the individual children’s rights (if possible with an integrated repetition of the most important children’s rights): What would be a suitable illustration for which card? Where can such objects (“treasures”) be found? Etc. It is important that the “treasure hunt” helps the children to familiarise themselves with children’s rights and to under-stand them better. They can only pick an object if they have understood what a particular children’s right means.
The children begin to decorate their treasure chests. They help each other to choose and share out the decorative material. The teacher decides how much time to allocate to this task. This could be completed either at school (possibly in an extra lesson) or as homework.
During the “treasure hunt” where children collect their objects and materials over the next four to five weeks, the pupils should exchange their ideas and show each other their finds: What have you found to symbolise which right? The pupils should be allowed to copy each other’s ideas. The children will engage in a kind of competition of who has the most beautiful treasure chest with the most creative and original ideas.
Lesson 3
One week before Universal Children’s Day (20 November): Each child displays the objects they have collected in an exhibition on their desks. They need not illustrate every child’s right with an object. A short “tour” of all the objects is held (10 min).
Each child explains to the others why they have chosen their objects (this happens after a short preparatory phase in groups of three or four).
After this, a plenary discussion is held under the teacher’s guidance, where the class discuss how the exhibition could be displayed on Universal Children’s Day (20 November) to the other pupils in school. Questions for the discussion: Are there any glass cases that we may use? Should we set up some small tables in the school building? Should we turn our classroom into a children’s rights museum on 20 November? Perhaps another third grade class has carried out the same plan – who will check with the other classes? Should we invite the head teacher, other teachers, parents and the housekeeping staff? Should we design a poster to advertise our exhibition? Should we organise a sort of opening ceremony for the exhibition? Should a child or the teacher hold a short introductory speech? Shall we rehearse or write and compose a song for this occasion? Etc.
Lesson 4
Universal Children’s Day, 20 November (or as close to this date as possible):
The pupils set up the exhibition according to the agreed plan and display their treasure chests for the other pupils in the school to see. In connection with this there must be some information on children’s rights (this information could and should also be disseminated in the opening speech and on the exhibition poster).
Following this, a class discussion/reflection should be held (possibly first in writing, then orally): How did the project go? What have you gained from it? What went well? What could we have done better? Etc.